Categories

Sunday, October 31, 2010


It's like living in a fairy tale world!
Recipe #53: Japanese pumpkin (kabocha)


When I first heard the story of Cinderella, I was fascinated with the magical pumpkin. It was cute and vivid, and I loved pumpkins at the time. Every year, as Halloween approached, we would buy all sorts of pumpkins. They made great decorations, and we would sometimes carve them. We even make some of them into desserts!

But when we planted Japanese pumpkin for the first time, we realized how good they were! They are extremely tender, and anyone who has tried them (including Americans who tried it for the first time) said they had never eat something so tender. They said it was like avacado. After they were more ripe, people said the pumpkins tasted like sweet potatos. Some even asked us if sugar was added. Since then, we no longer have "regular" pumpkins on our dining tables during Halloween.

Ingredients

1. half of a Japanese pumpkin, chunked and seeded
2. 2 sprigs of thyme
3. Salt to taste
4. 1/4 c. water
5. 2 pcs. ginger
6. 1 tsp. oil

Directions

1. Put oil in skillet; when oil is warm, add the ginger.
2. Add pumpkin and thyme; sprinkle salt and saute for about a minute.
3. Add water and put on lid, and turn heat to a lower medium-high.
4. After about five to seven minutes, or when water has evaporated, it is ready.

Tips

1. Thyme best matches the taste of pumpkin, better than the other herbs.
2. If you don't have herbs, you don't have to use them.
3. Soy sauce lovers can add some soy sauce and reduce the salt. In this case, don't add the thyem.
4. If you're having trouble chopping the pumpkin, cut it into wedges.

Friday, October 29, 2010


Turn leftovers into a great new dish!
Recipe #52: roast chicken with Napa cabbage


A while ago, we told you how to make a roast chicken flavored with herbs and lemons. If we don't have lemon, my mother would use salt, pepper and butter as a rub, which results in a beautiful roast chicken.

If we have leftovers, my mother would try to make it into a new dish. One of them uses Napa cabbage. Since my father loves roast chicken with Napa cabbage, my mother would sometimes use the entire chicken (save two legs for me) for this dish.

Ingredients

1. roast chicken (depends on how much you have), with the juice saved
2. 1 lb. Napa cabbage, cut into 1" x 1" chunks
3. 3 pcs. ginger
4. salt and pepper to taste
5. 1 1/2 Tbsp. oil

Directions

1. Heat oil in a large pot and add ginger.
2. Add Napa cabbage and saute. When it softens, add salt and pepper.
3. Cut chicken into pieces and put into pot (include the juice). Using a spatula, lightly stir the ingredients.
4. Put on lid and turn heat to low-medium.
5. After about ten minutes, put into bowl and serve.

Tips

1. Because we love Napa cabbage, we usually use 2 lbs. and let it cook for longer (for up to 30 minutes) to allow the flavor to get in. This creates a great aroma, but the chicken will lose flavor. Yu can adjust the cooking time to your needs, depending on which flavor you like.

Wednesday, October 27, 2010


Recipe #51: Omurice

If you like both omelettes and fried rice, you won't have a dilemmatic choice. You can enjoy the taste of both!

Ingredients

1. Refer to the ingredients for the shrimp fried rice. Omit the scrambled eggs, but prepare ten fresh eggs.
2. If this is too much, you can reduce the amount.
3. Ketchup (depends on how much you like)

Directions

1. Use the same method for making the fried rice, minus the scrambled eggs.
2. Add salt to eggs and beat them.
3. Add 1 Tbsp. oil to a saucepan. When oil is hot, add about two eggs into the pan and let it cook.
4. When egg is half cooked, add 1 c. fried rice and fold the egg and wait until the egg is fully cooked.
5. Move to plate, add ketchup and serve. Repeat the process for the remaining egg mixture.

Tips

1. If you are concerned about high cholestrol, you can replace some of the egg yolks with egg whites.

Monday, October 25, 2010


If you've never tried rice, you can start from this dish
Recipe #50: Shrimp fried rice


Rice is the main staple in Chinese cooking. However, ever since I started eating, I have refused to touch anything with rice. The older folks always thought, "How could this kid grow if he doesn't eat rice?" They saw it as a serious problem. "How could a mother not let their child eat rice? That will spoil him!"

I really ought to thank her. She has never gotten mad at me for refusing to eat rice. When I was about seven, she started to encourage me by giving me a tiny bit of rice at once. I stopped rejecting rice, but I would still eat only that tiny bit, and nothing more. However, I fell in love when I tried fried rice for the first time.

Whenever my family wanted to go out to eat at a Chinese restaurant, my only demand would be fish or fried rice (preferably both). However, most fried rice sold in restaurants is way too oily. In some cases, I could smell that the oil was not fresh, and I'd wonder if the oil was already used to fry something else. One of my mother's friends told us that she would develop a rash each time she eats fried rice.

If you like fried rice, I recommend making your own.

It's really not hard to make; many of my mother's friends first dishes are fried rice.

Ingredients

1. 2 green onions (scallion), chopped
2. 3 large eggs
3. 1/2 tsp. cooking wine and 1/2 tsp. corn starch
4. 1 tsp. salt
5. Pepper to taste
6. 4 Tbsp. oil, divided.
7. 4 cups long grain or brown rice, cold and cooked
8. 1 - 2 Tbsp. light soy sauce (optional)
9. 1/2 cup frozen peas, corns or other beans
10. 2/3 c. shrimps, peeled and divined

Directions
1. Put shrimp in a mixture of 1/2 tsp. cooking wine and corn starch, place in refrigerator for at least an hour.
2. Heat water in a pot. When it boils, add peas and corn. The pot stop boiling momentarily; when it resumes boiling, remove heat and drain the pot in a sieve. Set aside.
4. Lightly beat the eggs, adding a tiny pinch of salt.
5. Heat a wok or frying pan and add 2 Tbsp. oil. When the oil is hot, add the eggs. Stir and break up the eggs until they resemble scrambled eggs. Remove eggs and set aside.
6. Add 1 Tbsp. oil in a heated fried pan. Add shrimp and stir lightly until color turns pink. Set aside.
7. Add another Tbsp. oil in heated fried pan, and add rice. Stir-fry for a few minutes, using a wooden spoon to break the rice apart. Stir in the cooked vegetables. Sprinkle salt and pepper to taste.
8. When the rice is heated thoroughly, add the egg and green onion and shrimp back into the pan. Mix well and turn off heat. If you like soy sauce, you can may add it now. Server hot.

Tips

1. You can substititue white with brown rice.
2. If you are a vegetarian, you can omit the shrimp.
3. You can use any of your favorite vegetables, such as carrots and shelled edamame beans. However, carrots have a stronger taste, so we usually don't add carrots when we use shrimp.
4. Some people like oyster sauce or ketchup. You can add these sauces if you want, but be sure to adjust the amount of salt as well.

Saturday, October 23, 2010


Even meat lovers would love this meatless dish
Recipe #49: Angel hair with mixed mushrooms


I usually enjoy Italian pasta with meatballs, chicken or seafood. However, my mother has made two types of meatless pasta, both of which I love.

Especially this one. It is very aromatic and very delicious. Because this dish uses heavy cream and mixed mushrooms, it is hard to describe its incredible taste. Even a meat lover would like this.

Ingredients

1. 1/2 lb. angel hair
2. 2 c. mixed mushrooms
3. 3 cloves or garlic, finely chopped
4. 3/4 -1 c. heavy cream
5. 2 Tbsp. water
6. 1 Tbsp. olive oil
7. 1 Tbsp. white wine
8. sea salt and pepper to taste
9. chopped parsley

Directions

1. Follow the directions on preparing the angel hair. Remove from pot and set aside.
2. In a skillet, saute the mushrooms using medium-heat high heat.
3. Add garlic and continue sauteeing.
4. Add white wine, heavy cream and water. Bring mixture to a boil.
5. Add pasta into skillet, add salt and pepper, and move to plate.
6. Sprinkle with parsley and serve.

Tips

1. Various types of mushrooms (shiitake, shimeiji, abalone, button, etc.) are sold at farmer's markets.
2. If you can't them, you can buy dried mushroom mixes at warehouse stores, such as Costco.
3. Alternatively, you can look for frozen mushrooms, which are ready to use once they are thawed.
4. When cooking the angel hair, you can add oil and salt. Not only does this improve the taste, it also keeps the pasta apart and prevents the pot from frothing up, which can make a mess.
5. If you have any extra pasta, you can rinse it in cold water and add oil so it won't stick together.
6. Heavy cream is very rich, so this is why we add two Tbsp. of water.
7. When you add the pasta to the skillet, it will suck up the heavy cream. Don't add more heavy cream because of this; it will ooze out of the pasta again.
8. This pasta is very light, so you don't need to add cheese.
9. If you don't have parsley, you can use chives.

Friday, October 22, 2010


Great breakfast = great weekend
Recipe #48: Scrambled egg with Italian sausage


I have always loved American-style breakfast in restaurants, especially their omelettes or scrambled eggs. These breakfast add to the great memory of family trips. Sometimes during the weekends, we would have these breakfasts. In enjoying the meal, I get to reminisce the great feelings of vacations past, which brings about a great weekend.

Ingredients

1. 1/2 yellow onion, diced
2. 1 Italian sausage (any flavor you like)
3. 1/2 green peper, diced
4. 1/2 giant green pepper or 1 chili green paper, diced
5. 2 Tbsp. scallions (green onions)
6. 2 basil leaves
7. 1 Tbsp. oil
8. 4 eggs
9. black pepper to taste
10. pinch of salt

Directions

1. Cook sausage in pot until well done.
2. When sausage cools, remove skin. Tear into small bits.
3. In a skillet, add oil. On medium-high heat, when oil is slightly warm, add onions.
4. When onions are slightly soft, add sausage and continue stir-frying.
5. Add diced pepper. Saute until they are almost cooked, crack eggs into pan.
6. When eggs have slightly solidified, mix eggs and other ingredients and food using a spatula, breaking the egg into different pieces.
7. Add salt and pepper to taste, mix and put on plate.
8. Cut basil leaves into strips and add onto scrambled egg.

Tips

1. Sausage tends to be very rich. If you cook it first, it removes a lot of the oil. You can cook save some of the sausage for later use.
2. Sausage still produces oil when you stir-fry it, so you don't need to add so much oil.
3. Because sausage is also pretty salty, we only add a pinch of salt.
4. The sausage we use has a very strong basil taste, so we use basil only as a garnish.
5. You can use any pepper (red, green, etc.) you like. We use the ones picked from our backyard.
6. The recipe uses four eggs, but we use only one whole egg, and egg whites for the rest.

Wednesday, October 20, 2010


Recipe #47: curry tofu with peppers and onion

Curry usually carries a bit of spice. Since I disliked spicy foods when I was young, I would stay far, far away from my mother's curry, no matter how good it smelled. That is, until curry was recently discovered to have health benefits, such as its antioxidizing properties, alleviation of digestive problems and high iron content. I decided to try some for the first time. My mother like the Indian curry due to its authentic flavor - both strong and spicy. For me, however, she made a milder version.

Curry roux can often be found in Asian supermarkets and are mostly made in Japan. They are very convenient to use, but they tend to be too thick and sweet, so my mother made a modified version.

Ingredients

1. 1/2 carton tofu (1/2 lb.), cut into blocks
2. 1/2 onion, cut into medium-small pieces
3. 2-3 green and red bell peppers, cut into chunks
4. 2 cloves of garlic, pounded and shelled
5. 2 blocks of Japanese curry
6. 3 Tbsp. water
7. 1 tsp. Indian curry powder
8. salt to taste
9. 1 c. oil for frying

Directions

1. Using a small pot, fry until tofu is golden. Set aside.
2. In a separate pot, add water and curry blocks. Stir fry and mix until the blocks dissolve and the curry becomes thick.
3. Add 1 Tbsp. oil into a frying pan. Put garlic and allow its aroma to permeate, and add onion.
4. When the onion chunks soften, add the peppers and continue stir-frying. Add the tofu.
5. Pour in the curry sauce and powder, and add salt. Mix together and serve.

Tips

1. There is an increasing number of imported goods stores that sell jars of curry sauce. Although there is a great variety of flavors, you can use any one (about 1/4 c. will be enough) you like.
2. Japanese and Korean curry come in mild, sweet and spicy types. The Korean curry is more spicy and not as sweet, while Indian curry is both strong and spicy.

Monday, October 18, 2010


Yes, it's OK to have seconds!
Recipe #46: Boston pie


I love cakes with butter or whipping cream. However, due to the increased awareness of nutrition and calories, I tend to think twice before going for that second serving.

With our modified version, though, I don't have to worry about nutritional guilt!

There are different ways to make Boston pie. I tried two different methods, and I noticed that the pie is a lot finer, softer and silkier if I used the method for making the chiffon cake.

Ingredients

1. 4 eggs, whites and yolk separated
2. 3/4 c. sugar, divided into 1/4 c. and 1/2 c., plus an additional Tbsp.
3. 1/2 c. oil + 1 Tbsp.
4. 1 Tbsp. rum
5. 1 c. milk
6. 1/2 c. + 2 Tbsp. cake flour
7. 1 tsp. baking powder
8. 1/2 tsp. cream of tartar
9. pinch of salt
10. 3/4 c. heavy cream
11. powdered sugar

Directions

1. Preheat oven to 350 F.
2. Put egg whites and yolks in separate, clean bowls. They should not come into contact with any other liquids.
3. Mix egg yolks and add 1/4 c. sugar. Mix well, add oil rum and milk, and mix further.
4. Prepare another bowl, and mix flour and baking powder and sift.
5. Put the two mixtures together. Using a mixer, beat the egg whites at high speed. Add half of the 1/2 c. sugar (or 1/4 c.), to the egg whites. Beat for about ten seconds, and add the cream of tartar and remaining 1/4 c. sugar. Continue beating until small peaks form.
6. Mix about 1/3 of the meringue into the flour mixture (in a folding motion) at a time using a spatula, until no white streaks remain.
7. Pour batter into a tube pan. Cut through it to release air. Put in preheated oven and bake for about 25-30 minutes.
8. Remove the cake, turn it upside-down and let it cool completely. Take out the pie from the mold.
9. When base is cool, remove from mold and cut into half from the side horizontally.
10. Beat heavy cream and 1 Tbsp. sugar and beat at high speed until foamy.
11. Add mixture to cake base, thick at the center and thinner at the edges.
12. Put other half of cake base on top and add powdered sugar.

Tips

1. Most people like two layers of cream. If you want two layers, you can increase the amount of heavy and and sugar.
2. If you want a pie with two layers, a 7" pan is the best choice.

Sunday, October 17, 2010


A snack that will make you feel good all day...
Recipe #44: coffee cookies


Very few people could resist the temptation of the smell of coffee. Any cakes, bread or cookies that use coffee would smell (and taste) very good, so many people to use it as an ingredient.

Recently, studies have shown that frequently smelling coffee is good for the heart. One of our family friends had a heart surgery and was recommended not to drink coffee, but to smell the vapors. This supposedly makes the heart more active.

Our house is often filled with the aroma of coffee. We don't just brew it; my mother also uses it in many of her desserts.

Coffee cookies are among the aromatic desserts my mother makes. When she bakes them, the aroma passes through the doors, windows, flowers and trees, to the hood. Just one cookie will make you want a second, or even the entire plate.

Ingredients

1. 1 c. (2 sticks) butter, room temperature
2. 1 c. sugar
3. 1 Tbsp. rum
4. 1 1/2 - 2 Tbsp. instant coffee powder
5. 1/4 c. hot water
6. 2/3 c. cake flour
7. 1/4 tsp. baking powder
8. 1/2 c. almonds, sliced

Directions

1. Preheat oven to 350 F.
2. Dissolve coffee powder in hot water.
3. Mix cake flour with baking powder well, and sift.
4. Using a mixer, beat butter until it has a soft consistency.
5. Add sugar and continue beating.
6. Slowly add the coffee mixture.
7. Continue beating will adding rum.
8. Add flour mixture and sliced almond, and mix well gently with your hands until it becomes a soft dough. Let mixture rest for 15 minutes.
9. Removing a portion at once, roll it into a ball and press into the shape of a cookie.
10. Place on middle rack of oven and bake for about 20 minutes.

Tips

1. We substitute 1/3 of the cake flour with whole wheat flour. This is a healthier option that does not affect the texture.
2. You can change the amount of sugar to your liking.
3. You can add another 1/4 c. of sliced almonds if you like.

Sunday, October 10, 2010


How to enjoy a cake without getting fat
Recipe #43: green tea chiffon cake


Every year, my parents would take me to a well-known bakery on my birthday to buy me something I want. I would usually pick something with a lot of chocolate, mousse, tiramisu or something with a lot of whipping cream.

My mother loves these desserts as well, so the two of us would quickly finish them.

However, after learning some recipes, I started paying more attention to the nutrition value of many ingredients. This year, I decided to celebrate my birthday in a different way: I tried making my own dessert, a "healthy" green tea chiffon cake with reduced fat and sugar.

Recent studies have shown that green tea has many health benefits. For example, it it lowers cholestrol and has antiozidizing properties. If you like angel food cake, you will love this recipe as well. It is full of the aroma of green tea and fresh eggs. Although it looks simple, it is actually quite elegant.

Ingredients

1. 4 egg whites and 3 yolks
2. 1 c. sugar, divided
3. 1/4 c. oil
4. 1 Tbsp. rum
5. 1 c. + 1 Tbsp. water or milk
6. 3/4 c. minus 1 Tbsp. cake flour
7. 4 tsp. green tea powder
8. 1 tsp. baking powder
9. 1/4 tsp. cream of tartar
10. pinch of salt

Directions

1. Preheat oven to 350 F.
2. Put egg whites and yolks in separate, clean bowls. They should not come into contact with any oil or water.
3. Mix egg yolks and add 1/2 c. sugar. Mix well, add oil rum and milk, and mix further.
4. Prepare another bowl and mix flour, green tea and baking powder using a fork and a sieve.
5. Put the two mixtures together. Using a mixer, beat the egg whites at high speed. Divide the remaining sugar into two parts. Add one part the egg whites. Beat for about ten seconds, and add the cream of tartar and remaining sugar. Continue beating until small peaks form.
6. Mix about 1/3 of the meringue into the flour mixture (in a folding motion) at a time using a spatula, until no white streaks remain.
7. Pour batter into a tube pan. Cut through it to release air. Put in preheated oven and bake for about 25-30 minutes.
8. Remove the cake, turn it upside-down and let it cool completely. Take out the cake from the mold.

Tips

1. We personally reduce the sugar to 1/3 cup.
2. We also substitute the milk with soy milk.
3. When a stick inserted into the cake comes out clean, the cake is ready.
4. The egg whites and yolk much be separated carefully. If there is any yolk in the whites, you must remove it; otherwise, the recipe will not turn out well.

Saturday, October 9, 2010

recipe #42: pork with Napa cabbage and cilantro/celery leaf dumpling/pot sticker filling (大白菜香菜/芹菜葉豬肉餡)


Cilantro seeds have a very hard shell, so it's sometimes said that they should be soaked overnight before being planted. My mother has tried sowing fresh seeds, as well as soaking them for one or two days first, but the harvest would always be very small. Because there were so few plants, my mother left them alone. One year, there were so many cilantro plants that they were everywhere. Friends would pick them by the basketfull.

Because there were so much cilantro, my mother thought up ways to use it up. She figured that it would go well with the filling mentioned in the previous recipe. Unexpectedly, the dumplings were very aromatic. (We actually saw pork and cilantro wontons on sale at Costco recently, and the samples tasted much like our dumplings.)

My mother also noticed that celery leaves smelled just as good. Since most of the celery's nutrients are in the leaves, she realized that throwing them away was a waste. The resulting dumplings become very, very good when mixed with chopped cilantro.

The ingredients and directions are the same, except with the addition of 1/2 to 1 c. cilantro or celery leaves at the end.

Tips

The filling can also be used in pot stickers.

In other news...

My mother recently started a blog of her own, which you can view here. It features many of her articles and works of art, but it also contains a fair share of recipes. After all, cooking is an art. :-) Her blog is in Chinese, though.

Thursday, October 7, 2010

recipe #41: pork with Napa cabbage dumpling/pot sticker filling (大白菜豬肉餡)


Cabbage is a very popular filling in American-style dumplings. However, Napa cabbage (note the difference) is used more widely in Chinese dishes. They have different flavors, but both taste very good.

Ingredients

1. 1 lb. Napa cabbage
2. 3 tsp. salt, divided
3. 1 lb. lean ground pork
4. 1 Tbsp. cooking wine
5. 1 Tbsp. sesame oil
6. Pepper to taste
7. 1 tsp. minced ginger

Directions

1. Prepare a 5-qt. pot with 70% water and bring it to boil.
2. Add washed Napa cabbage, piece by piece, into the pot and remove after ten seconds
3. After it cools, cut it into horizontal strips, and then cut into smaller pieces.
4. Squeeze out the excess by wrapping it in a cheese cloth. (Refer to the linked post for a picture.)
5. In a large bowl, mix the ground pork with ginger, salt, wine, pepper, 1 Tbsp. sesame oil and olive oil evenly.
6. Add Napa cabbage and remaining sesame oil, and mix well.

Tips

1. We use Japanese sake for the cooking wine.
2. If you like soy sauce, you can a Tbsp. of it in the filling.
3. The filling can also be used in pot stickers.

Friday, October 1, 2010

recipe #40: Chinese chive pockets (韭菜盒子)


Chinese chives are another popular ingredient in Chinese cooking, as they can be used in many dishes, especially dim sum. They pair with other foods fairly well, such as chicken, pork, fish, shrimp, egg and tofu. There are many different types of dim sum that use Chinese chives, such as dumplings, pot stickers, pork buns and various Cantonese dishes.

Chinese chives are easy to plant and easy to grow. As long as you can get a few chives and plant them a few inches apart, you will get clusters of them after a few years. Due to their fast growth, you will need to divide them every three years or so; otherwise, they will wither and die due to overcrowding. When there is a large harvest, one way to take care of it is to make Chinese chive pockets, which are a very popular dim sum dish among Chinese people, who believe that Chinese chives are good for the body; they have strong energy, especially if haarvest in the early spring, right after the entire winter. The chives are tender and aromatic. They regrow after being harvested, so there is an essentially unlimited supply of them. Due to the strong aroma of Chinese chives, you do not need any meats to create a great taste. There are few people who dislike Chinese chive pockets. There are many methods to improve the taste even more.


Ingredients (filling)

1. 3 eggs, beaten
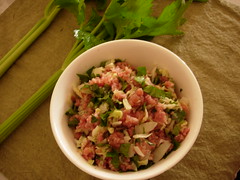
2. 1 lb Chinese chives, finely chopped
3. 1-2 pieces of bean curb, finely chopped, or 6 oz. fried tofu
4. 1 pack (2 oz.) of dried bean threads (also called crystal noodles, among other names)
5. 1/2-1 tsp. salt to taste
6. 4 Tbsp. plus 2 tsp. cooking oil, divided

Directions (filling)

1. Fill up a 1-qt. sauce pan with 70% water and bring it to a boil.
2. Soak bean threads in boiled water for a minute.
3. Drain the extra water immediately, rinse the bean threads with cold water and drain again. Finely chop the bean threads.
4. Heat 2 Tbsp. of oil and add beaten eggs. Cook and break up bits of eggs into small size and set aside.
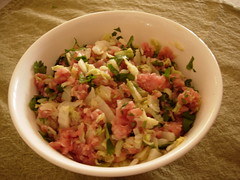
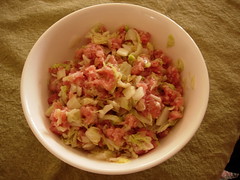
7. Heat remaining 2 Tbsp. oil, add Chinese chives and stir-fry for a minute. Add chopped bean curd, continue stir-frying, stir in the bean threads and put eggs back to pan.
8. Add salt and mix well.

Ingredients and materials (wrap)

1. 3 c. all-purpose flour
2. 1/2 c. boiling or very hot water
3. 1/4 c. cold water
4. handful of flour (about 1/4 c.) to prevent sticking during kneading
5. a rolling pin

Directions (wrap)
1. Mix the flour with hot water using a fork.
2. Slowly add the remaining water and combine ingredients to a rough dough shape.
3. Put a handful of flour on a table and knead the dough, making sure to add water or flour until you get a smooth consistency.
4. Cover with plastic wrap for about 30 minutes.
5. Divide dough into about 14-16 pieces. Using a rolling pin, make each piece into an oval shape.
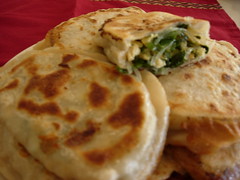
Directions (pockets)

1. Using a large spoon, scoop filling onto center of wrap.
2. Fold the wrap together towards each other; this should create a "semi-circle."
3. Seal the wrap by pinching with your fingers.

Directions (cooking)

1. Put 1 tsp. oil in a large saucepan; turn the pan to evenly distribute the oil.
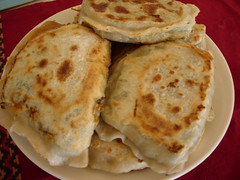
2. Arrange 7-8 pockets in the pan and cooking using lower medium-high heat. After a few minutes, the bottom will become golden brown.
3. Turn the pockets over and cook until the other side is also golden brown. It is now ready to be served (this part is very important; refer to the tips below for best results).
4. To finish cooking the batch, just repeat step 3.

Tips

1. Some people like an even stronger flavor, which can be achieved by adding 2 Tbsp. of tiny dried shrimps. These are very salty, so you must reduce the amount of salt if you add the shrimps.
2. The reason for using hot water is to make the dough half-cooked. If you used a thin wrap, you only have to cook a little more. If you can't make the wrap so thin, you can use the same method for the pot stickers, except you must add 3/4 c. water.
3. If you have leftover pockets, you can microwave them after storing them in the freezer; it still tastes very good. Also, you can keep the uncooked pockets in the freezer and cook them later. You don't have to thaw them, but you must use the method for the pot stickers.