Categories

Monday, August 30, 2010


The luck of the Irish
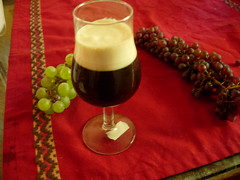
Recipe #11: Irish coffee drink


In the story for the three-cup chicken, I mentioned why I'd stay clear of wine. Unless the wine was cooked with food, I would always avoid it. As for drinks, the only beverage I'd still drink is my mother's Irish coffee.

Irish coffee was invented 1942 by Joe Sheridan, an Irish bartender. It was a warm and cozy drink for the first Westerners to visit Ireland. Maybe it was because they were moved, but the unique of Irish coffee truly has many affecionados.

Since our recipes focuses on healthy, we cut down on cream unless it is absolutely needed. Of course, some dishes don't taste like the original once the heavy cream is gone. However, that does not mean it won't taste good! For the coffee that has the taste of Irish cream, people who have tasted it still love it. They would always want seconds.

Instructions

1. 1 c. coffee, brewed
2. 1 Tbsp. brown sugar
3. 1 shot whiskey (about 1.5 oz.)
4. 1/4 cup cream

Directions

1. Fill a warmed glass with coffee until 3/4 c. full.
2. Add sugar and stir.
3. Add the cold cream on top of liquid.

Tips

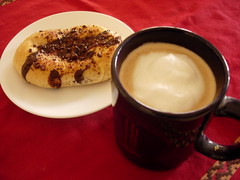
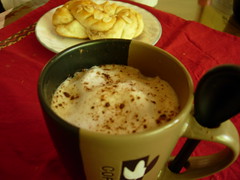
1. This serving is for 10-12 oz. cups. If you want to use a smaller cup, as shown in the photo, you can scale it down.
2. You can slightly beldn the heavy cream, but not too much (i.e., a few seconds).
3. If you're a health nut and don't want to use so much cream, you can check the method that my mother used: add 2 tsp. white sugar to the prepared coffee, and mix well and stir in one pack of CoffeeMate creamer. Finally, add two tsp. of Bailey's Irish cream and mix well. It tastes very, very good.

Sunday, August 29, 2010


Recipe #10: cafe mocha

If you liked the previous recipe (cappuchino), you'll love this one as well!

Ingredients

1. 1/2 c. fresh coffee, brewed
2. 2 Tbsp. chocolate syrup
3. 1/2 c. whole milk

Directions

1. Using a blender, beat the milk until it gets foamy
2. Microwave the milk for about 45 seconds on high
3. Prepare a 10-oz. cup. Pour syrup in.
4. Pour coffee in and mix well using a spoon.
5. Add the milk.

Tips

1. If you want something sweeter, add more syrup or sugar.
2. If you want something rich, you can substitute the milk with heavy cream. Alternatively, you can do half-and-half. You can also use whole milk, and add a packet of creamer in the coffee first.
3. For mugs over 10 oz., you can adjust the amount of milk or coffee to your liking.
4. Chocolate syrup can be subsituted with a combination of cocoa powder and sugar.


Cappuccino, cappuccino and cappuccino
Recipe #9: You guessed it, cappuccino!


Both of my parents enjoy coffee. Mom brews it every morning, so my father and I literally "wake up and smell the coffee" at breakfast time. This is the luckiest thing in the world - every day is like a good start.

Because I like the smell of coffee and the taste of ice cream bars, I once asked my mother to buy a box of cappuccino-flavored bars at a supermarket, which was made by a well-known coffee brand.

Every day after dinner, I would eat one of them... it was heavenly. Although I go to bed late, I felt pretty wired up, and one day, I was unable to fall asleep until I 2:00 a.m. I was a bit worried. My mother thought it was unusual, so she decided to find out the cause of my insomnia. Looking for the root of the cause, she suspected that the caffeine in the cappuccino-flavored bars (to a young kid, the caffeine was probably too strong). Since then, I have known caffeine was to be avoided at all costs, so I would never drink any coffee.

When I was in college, some of my buddies would like to go to coffee shop. Since I did not, I felt I was not in their circle. My mother made two kinds of coffee, mocha and cappuccino, for me to try. I tasted it, and it was a wonderful drink; it was even better than the brand I mentioned (or maybe it was because our coffee was better). In a delightful weekend, the start of one day is marked by the delightful coffee. All of our friends love coming to our house, probably because her coffee is so good. Anyways, it's a treat for all of us.

Ingredients

1. 1/2 c. strong coffee, brewed
2. 1/4 c. milk
3. 1 tsp. sugar
4. Cocoa powder (optional)

Directions

1. Prepare the freshly brewed coffee, hot and strong, and add sugar.
2. Using a blender, beat the milk until it gets foamy
3. Microwave the foamy milk for about 30 seconds on high, and pour into the hot coffee.
4. Use a spoon and put the foam on top of the coffee.

Tips

1. If you have an espresso machine, you can make espresso. Otherwise, use a brewer. If you're using espresso, reduce the coffee to 1/4 cups and increase the milk to 1/2 cups.
2. You can use skim milk.
3. Sugar is optional. It is totally up to you.
4. If you like the taste, you can add some cocoa powder.
5. Different microwaves have different power, so be sure to stop the microwave before the coffee boils over.

Thursday, August 26, 2010


A dish with the aroma (but not the bitterness) of wine
Recipe #8: three-cup chicken/sanbeiji


Once, when I was little, I saw my father drinking something. It looked really good, so I asked him, "Dad, what are you drinking?" He told it me was wine. I asked him, "What does wine taste like?" He told me it was spicy and bitter. As soon as I heard that it was bitter, I no longer wanted to taste it. From then on, my impression was always that wine was bitter.

Until a few years ago, I would reject anything that had to do with wine, not just wine itself. However, there is one exception: dishes that involve wine. Of course, my mother neve encouraged me to drink wine, but she thought it wasn't to turn down anything with wine in it. The first time she made a dish called three-cup chicken, it smelled so good that the entire street must have smelled it. I joked to my mother, "Let's be careful. We don't want people driving recklessly because they got distracted by the flavor. Is someone going to come knocking on our door?" It tasted so good that I could hardly put down my chopsticks. I asked her how she made it, and she told me that the "three cups" are one each of wine, sesame oil and soy sauce.

I could hardly believe that there was wine. One of our family friends loved to try different kinds of food. She said that out of all the three-cup chicken dishes she has tried, none were as good as my mother's. Those made in restaurants were a bit bitter, even though the wine was gone. The meat was also harder due to overcooking. She wanted to know how my mother made it. Of course, you will know once you read the tips.

Ingredients

1. 3 whole chicken legs, or a half chicken
2. 1 bunch Asian basil
3. 2 slices ginger
4. 2 Tbsp. dark sesame oil
5. 1/4 cup each of soy sauce, sake and water

Instructions

1. Cut chicken legs into 1 inch×inch pieces.
2. Wash basil, drain, and keep only the leaves
3. Heat sesame oil in a large skillet over medium-high heat. Add ginger. Wait about 1/2 minutes and add chicken legs
4. Sir-fry until lightly brown on all sides, which takes about 3 minutes.
5. Add soy sauce, cooking wine and water. Bring to a boil, then reduce heat to low and simmer for about 30 minute, or until there is only about 1/4 cup of liquid left in the skillet .
6. Stir in the basil and increase heat to medium-heigh; continue cooking until the liquid is almost gone.

Tips

1. The "three cups" can be that from the original recipe: wine, sesame oil and soy sauce. Howeer, soy sauce tends to be very salty, and there is limited choice in the United States, so you can replace it with water.
2. If you don't have Asian basil, you can use regular basil. The dish still tastes just as good.
3. The original recipe uses Taiwanese rice wine. However, it is very strong bitter, so my mother uses Japanese sake. Thus, there is no bitterness at all; the taste is very light. Because of adding water and cooking over low heat, the chicken is very tender. The reason for using medium-high later is to let the liquid thicken, and let the gelatin-like texture appear. The mixture sticks to the chicken and makes it beautiful and aromatic.

Monday, August 23, 2010

Culinary alchemy with green onion


Recipe #7: Chicken with scallion oil

Scallion (green onion) is often used in Chinese cooking. When scallions are planted, it is usually done so in a large amount. No matter what day or how often they're planted, they will all bloom at once. So when the flowers are the prominent, we must use dishes that use a lot of onion, to avoid waste.

Chicken with scallion oil is one such dish. Making this dish looks fairly easy, but it has an incredible flavor. Since this is the time when onions are the most prominent, I thought I'd use this opportunity to share this recipe.

When making this dish, there are a few things to consider: 1) the onion must be cut into thin slivers, lengthwise. It takes the skill of a master swordsman to cut so precise. 2) You must chop the chicken, the chopping knife in one hand, and using the other one to hold it still. It's a bit scary, if you ask me! 3) Finally, you must drizzle the hot oil on the onion. You must do it when the oil is at the right temperature, which can be a bit hard to catch. However, you will get the hang of it after enough practice. When the aroma fills the room, I realize that I would be willing to feel the fear of that big knife.

Ingredients

1. Half chicken or 3 whole legs
2. 3 green onions, shredded, with white and green parts
3. 6 sliced ginger roots
4. 1 1/2 tsp. salt
5. 2 Tbsp. cooking oil

Directions

1. Rub the salt on the chicken and put ginger on top
2. Put chicken in container and cover overnight.
3. Using steamer, cook chicken for about 30 minutes
4. When the chicken is done, remove the ginger and let cool slightly, cutting chicken into pieces or chunks, and arrange on a serving plate.
5. Spread scallions on chicken
6. Heat the oil; when it is hot enough, drizzle it on the scallions; you can hear the sizzling sounds
7. Serve hot

Tips

1. If you do not chop using bone knife, you can use boneless chicken
2. You are cooking at a high terperature, so you should use oil that can withstand high terperatures, such as canola or soybean. However, do not use cooking or frying oil oil, as the taste does not match well.
3. When steaming, you can use any steaming container to give the best effect. Different steaming devices require different time. You can check by using a fork chopstick; if the juice is clear, the chicken is done. If it is pink, you must continue steaming.
4. You can add cooking wine if you like the taste of wine. However, if you not add wine, you can enjoy the original unique taste. Personally, I like it without wine.
5. After rubbing the salt, the overnight step is important. This allows the taste to enter the chicken. The special taste is from this step. Many people use merely rub it for a short time, but the taste does not compare.
6. Shredded scallion can be bought at Korean supermarkets.

Friday, August 20, 2010

A fantastic experience


Recipe #6 chocolate Madeleine cookies

Mom loved chocolate as a kid. She ate mostly chocolate candies while rarely touching the other ones. As she was raising me, my mother would sometimes reward my good behavior with candies, which were all chocolates. Like her, I knew how to enjoy the smooth and rich texture, as well as the happy feelings. Chocolate is like a person's life; there is sweetness within bitterness, and bitterness within sweetness. It may be bitter at first, but the aftertaste would always be sweet.

Since both my mother and I like chocolate, we would often share some right after a meal, "rejuvenating" us for the afternoon. Of course, that's not enough. My mother knows how to make many recipes that use chocolate, and she'd never give up trying them. For desserts she enjoys, she would see how a chocolate version would taste.

Our last recipe covered madeleine cookies, which are delicious in their own right. But my mother thought, "How would chocolate madeleines taste?" Contrary to our expectations, all of my friends and classmates told us that they were in love with the flavor. One of them actually said, "Your mother is my favorite lady. She's just as sweet as the chocolate!"

Ingredients

1. 5 Tbsp. cake flour, sifted
2. 1 Tbsp. unsweetened cocoa powder
3. 2/3 tsp. baking powder
4. 1/4 cup butter
5. 1/2 cup chocklate chips
6. 1/4 cup sugar
7. 2 eggs
8. confectioners' sugar for decoration

Directions

1. Preheat oven to 350 F
2. Sift the flour, cocoa, baking powder and salt together. Set aside.
3. Beating eggs, one at a time in a bowl, add sugar and continue beating
4. Melt butter; while butter is warm, add egg mixture.
5. Stir in the dry ingredients, folding them in
6. After mixing well, tap mixture on table to release air
7. Place rounded teaspoon of batter into Madeleine molds
8. Bake for 12-15 minutes.
9. Remove from oven and immediately invert onto a wire rack to cool. Once cool, sprinkle with confectioners' sugar, if desired.

Tips

1. If you don't have chocolate chips, the semi-sweet variant will work.
2. This version tastes more like taste; you can use a mixer with the eggs with necessary.
3. If you use a non-stick mold, the cookies will right out the first few times. However, the non-stick property diminishes after some time, in which case you may want to spray some cooking oil first, followed by a thin layer of flour. Only then put in the batter.

Sunday, August 15, 2010

The dessert of the kings


Vanilla madeleines

I was in choir during 12th grade. That was one of the highlights of my high school years and gave me fond memories. Due to my newfound love of choral music, I sometimes went back to attend the performances.

One such concert was grand, fervent and a very poignant experience. There was a reception afterwards with desserts and hot cider. The madeleines immediately caught my attention. I don't know whether it was their origin, name or shape that is romantic, but Mom and I each decided to try one. They turned out to be one of the best cookies I've ever had - neither the taste nor texture could be any better. Although I've tried other versions since then, none of them came close.

That inspired us to experiment with different recipes to try to recreate the taste. Mom shared her most recent batch with my graduate class, and much to our surprise, everyone asked us where we bought them. Upon learning they were homemade, several classmates requested the recipe. Although this recipe is more difficult than the others, you can get varying textures through different methods.

Ingredients

  • 5 tbsp cake flour
  • 1 tbsp unsweetened cocoa powder
  • ⅔ tsp baking powder
  • ¼ cups butter
  • ½ cups chocolate chips
  • ¼ cups sugar
  • 2 eggs

Directions

  1. Preheat oven to 350° F.
  2. Sift flour, cocoa, baking powder and salt together. Set aside.
  3. Lightly beat eggs.
  4. Heat butter until melted. Add sugar and stir.
  5. Immediately add eggs to mixture.
  6. Stir in dry ingredients, folding in mixture to prevent sticking together.
  7. Pour batter into prepared madeleine pan - there should be enough for a dozen.
  8. Tap pan to remove air.
  9. Bake for 12-15 minutes.
  10. Remove from oven and immediately invert onto wire rack to cool.

Tips

  1. Our version more closely resembles cookies. This is why so many people wanted the recipe, although it's somewhat harder to make.
  2. It may be easier to beat the eggs until they are fluffy before adding sugar. In this case, continue beating the mixture until it is pale before adding melted butter. However, the resulting texture will be between that of cookies and cake.
  3. The reason for beating the eggs gently is to prevent air from getting in as air bubbles make the texture rough. These cookies take a lot of skill to prepare and are expensive for this reason. That said, everything gets easier with practice.
  4. You can use other molds to create different shapes, such as the heart shown above.
  5. Put the cookies in a box if you're giving them to someone. This makes them look very professional.

Friday, August 13, 2010

An aromatic memory from Mom's childhood


Banana nut bread

As a former general in the Republic of China Armed Forces, my late maternal grandfather Ching-Shang once had a very large home. He had many high-quality fruit trees in his backyard, including banana trees. They had multiple trunks that grew together over the years. The bananas would start growing by the bunch once the beautiful flowers blossomed, turning yellow after the test of time.

Mom couldn't give in to the temptation and went to pick a bunch. However, the trees were full of unusual spiders that she had never seen. They had many white dots and looked dangerous. The spiders seemed to have only seven legs, one of which was long and hairy unlike the others. Carefully avoiding the spiders, my mother was able to get some bananas.

She had never tasted one so good. But when she later went back for more, the spiders and the webs were now everywhere. Seeing that there was no way to get to the bananas without touching the spiders, Mom eventually gave up. She was afraid the spiders would endanger her family - particularly her sisters - and convinced her father to cut down the trees. Although she never tasted any more of those bananas, they were a wonderful memory in her childhood.

Fast forward many years: my mother eventually learned how to make banana bread. She had tried many recipes and ultimately found one that was simple enough. It was easy to follow and perfect for an autistic person like me. Yet this recipe is also the most delicious. The aroma and moisture make it even more so. When I shared it with my graduate class a few days ago, the 24 pieces were gone in minutes. Some classmates loved it so much that they went for thirds!

If you ever taste this bread, then I wouldn't be surprised if you eat the entire loaf. ^_^

Ingredients

  • 1¾ cups all-purpose flour
  • ¾ tsp baking soda
  • ¼ tsp salt
  • ¾ cups sugar
  • 2 eggs
  • ⅔ cups oil
  • 3 tbsp milk
  • 2 tsp vanilla extract
  • 1 cup mashed bananas
  • ½ cups chopped walnuts

Directions

  1. Use fork to combine dry ingredients: flour, baking soda, salt and sugar. Set mixture aside.
  2. Beat eggs in bowl, and blend in oil, milk and vanilla extract.
  3. Stir in banana and walnuts.
  4. Combine dry and wet mixtures into batter.
  5. Pour batter into non-stick loaf pan. Bake at 350° F for approximately 50 minutes or until toothpick inserted in center comes out clean.

Tips

  1. Use fully ripe bananas for best results. The ideal time is when the spots are just starting to appear.
  2. One cup is equal to about two large bananas or 2.5 medium-sized ones.
  3. The milk can be substituted with soy milk for a vegan version of this recipe.
  4. The ingredients can be doubled to make two loaves at once.
  5. The bread can be stored in the freezer for a long time and won't become soggy when thawed.

Monday, August 9, 2010

An omelette you'll never get tired of


Spinach and mushroom omelette

Aside from making dishes that taste and smell good, my mother is skilled at creating attractive food presentations. However, nutrition is what matters the most to her.

She recently had some friends come over. Because they were mostly vegetarians, egg is a major source of protein for them. Mom made them a nice meal, and their favorite dish was an absolutely delicious and nutritious omelette. The spinach and peppers are all from our garden.

This recipe is to easy to follow even if you're a novice at cooking - the only tricky part is folding the omelette. Regardless of the occasion, anyone who tastes this dish would want it for every meal. It's hard to not eat the whole plate!

Ingredients

  • 1 tbsp olive oil
  • 3 large mushrooms, sliced
  • ¼ cups red, green and yellow bell peppers, sliced
  • A handful of baby spinach leaves
  • About ¼ cups mozzarella cheese, shredded
  • 3 large eggs, beaten
  • A pinch of salt

Directions

  1. Add salt to eggs and slightly beat them. Set mixture aside.
  2. Heat olive oil to large frying pan over medium-high heat and add egg mixture.
  3. When mixture begins to thicken, add peppers and mushrooms, in that order. Sprinkle in spinach leaves and gently add cheese.
  4. Cook eggs until light brown.
  5. Using two spatulas, carefully hold omelette in one hand and use other to fold into third of original size.
  6. Let stand for 1 minute. Fold omelette again and flip over. Transfer to serving plate.

Tips

  1. You can experiment with different ingredients or change them to your liking - such as substituting the mozzarella with your favorite cheese. However, the mozzarella is what creates the cheesy texture and improves the taste.
  2. This is a personal preference, but we usually use two whole eggs and two egg whites to reduce the cholesterol.
  3. You may notice that the omelette in the second photo has no cheese. This is to show the other ingredients.

Sunday, August 8, 2010

"Can I have one more plate?"


Penne with sausage and roasted red peppers

Mom discovered a whole new world when we visited an Italian restaurant in the U.S. for the first time. The place had a rustic feel and was reminiscent of the countryside. Though my mother had tried pasta while growing up in Taiwan, she was surprised to find that it tasted very different than she expected. The dishes were flavorful and filled with the aroma of fresh herbs. Only then did she realize this was what true Italian food was like.

That was what sparked her interest in Italian cuisine. Having planted many herbs, Mom would pluck ingredients from the garden whenever she wanted to make an Italian dish. For example, she may add a tablespoon of chopped rosemary to her pastas.

I was initially under the impression that pastas were difficult to make. Although today's dish is the result of many years of experience, this version has been greatly simplified. Yet the taste and style haven't changed. Due to its texture and presentation - as well as the aroma and nutrition - our dish is extremely popular at gatherings.

Ingredients

  • 2 red bell peppers
  • 2 tbsp olive oil
  • 1 large chopped onion
  • 2 cloves of garlic, minced
  • ½ lb Italian sausage
  • 28 oz canned plum tomatoes, peeled and roughly chopped
  • ½ lb penne pasta

Directions

  1. Preheat oven to 400° F.
  2. Cook penne according to package directions and drain.
  3. Place red peppers into oven and roast for 20 minutes or until skin wrinkles. Keep in oven for another 10 minutes.
  4. Remove skin, stem and seeds from peppers. Cut peppers into small pieces.
  5. Heat olive oil in large saucepan. Add onions and sauté over medium heat until tender.
  6. Add sausage, breaking up with spoon until almost cooked.
  7. Add garlic and sauté for 2 minutes.
  8. Add roasted peppers and mix well.
  9. Stir in tomatoes and bring to a simmer. Season with salt and pepper to taste, and cook for 10 more minutes.
  10. Combine pasta with sausage mixture.

Tips

  1. As the story suggests, you way want to add herbs, such as rosemary or basil.
  2. You can use other peppers besides the red ones. However, avoid green peppers as their taste is too strong and doesn't mix well with this recipe.
  3. As shown in the second image, grated Parmesan cheese can be used to improve the taste.
  4. Plum tomato is very sweet and goes well with peppers. If you prefer, you may use diced tomatoes instead and optionally add basil.

Wednesday, August 4, 2010

Something even the onion haters would enjoy


Onion focaccia

When we decided to use our garden for food, none of us knew what to plant. Therefore, my family visited an Orchard Supply Hardware store to get some ideas. As soon as we walked in the door, Mom saw bags of small onion bulbs for sale. She bought a bag after having heard that green onions were easy to grow at home.

Each bag had about a hundred bulbs. Realizing that we couldn't eat so many onions at once, Mom planted a quarter of them and saved the rest for later. Growing them was much easier than expected. The onion sprouted after just a few days, and were large and plump at harvest time.

Because onions are frequently used in Chinese cuisine, they quickly ran out. But when we went to plant the remaining bulbs, they had already dried up and died. Mom didn't want to use up the ones left in the ground and only cut off the leaves. The onions eventually stopped growing after a while.

The following year, my mother noticed that the onions were still alive. They didn't sprout but had grown multiple roots. She had no idea they could get so big and wasn't even sure they were edible. Although we were afraid they were poisonous, Mom gave the onions to a friend that wanted them. Several days later, the friend reported that - not only did she not get sick - they were the best onions she has ever tasted. Only then did we realize how silly we were!

Since then, my family would often use green onions in our dishes. Mom's favorite onion recipe is her homemade focaccia - nobody who has tasted it could turn down the allure. Our friends would always take it home to share with their families. Though I never really ate onion as a kid, the focaccia smelled so good that I couldn't give in to my temptations. It became one of my favorite foods and eventually led me to enjoy other onion dishes.

Focaccia usually comes in the onion and olive varieties, but we sometimes combine the two ingredients. This is the first dish I learned from my mother. Our version is different from the focaccia sold in bakeries.

Ingredients

For the base:

  • ¾ cups water
  • 1 extra large egg
  • ¼ cups olive oil
  • 1 tbsp sugar
  • 2 cups bread flour
  • 1 cup whole wheat flour
  • 1 tsp salt
  • 2 tsp yeast

For the topping:

  • 2 medium-sized onions, julienne
  • 2 tbsp chopped garlic
  • 1 to 1½ cups mozzarella cheese
  • ⅓ cups mixed olives

Directions

Before making the base, preheat the oven to 350° F and prepare the topping as follows:

  1. Add 2 tsp olive oil to skillet and cook onion for several minutes using medium-high heat.
  2. Add garlic, followed by salt and black pepper to taste.
  3. Sauté until onion softens.
  4. Set aside and let cool.

For the dough:

  1. Combine base ingredients in bread machine. Use "dough" setting for best results.
  2. Once dough is done, remove from container and flatten.
  3. In the meantime, begin preparing the topping as follows.

Preparing the focaccia:

  1. Form dough into pizza shape.
  2. Use fork to make holes in dough.
  3. Spread onion on top of base.
  4. Evenly distribute mozzarella cheese on top of onion.
  5. Add mixed olives to focaccia.
  6. Let dough rise in warm place for 30 minutes or until size has doubled.
  7. Place focaccia on lower rack of oven and bake for 20 minutes or until edge becomes golden brown.
  8. Remove from oven, place on wire rack and serve warm.

Tips

  1. Be sure follow the bread machine instructions. Every machine is different, especially when it comes to handling moisture. One rule of thumb is that the longer it takes to knead the dough, the more water is required.
  2. If you don't want to use whole wheat flour, you can use three cups of all-purpose flour instead.
  3. From personal experience, either soft or caramelized onion works well. They have different flavors, but both are delicious in their own way.
  4. You can use any type of onion, such as red and white ones. Of course, those aren't the only options. One thing I've learned from Mom is that cooking is a creative art - anything that tastes good can be used.
  5. In our opinion, the best mixed olives (also called bruscetta) are the Martha Stewart brand. You can sometimes find them at Costco or any regular grocery store.
  6. The shape of the dough doesn't have to be a circle. It can be an oval, strip or anything you like. I personally prefer the pizza shape as it gives a better texture.

Monday, August 2, 2010

An insight of things to come...


I loved playing barefoot in our old backyard ever since I took my first steps. I'd often spend the entire afternoon looking at the bushes, trees and butterflies. The yard was mostly filled with sharp white rocks, thorny berries and shriveled flowers, but that was the way things were when we bought the home.

Realizing that I loved the outdoors, Mom removed the dead flowers and thorny plants. Dad purchased some wood, around 100 bags of potting soil and all kinds of seeds - and my parents used them to create a 12' × 12' patch. They were happy as long as I enjoyed the garden. Its purpose was to let to see the cycle of life - from sprouts to withered leaves. I absolutely loved the garden even though it didn't produce anything edible. The garden wasn't just a haven for slugs, bugs and birds, but also one for me.

We moved to a house with a larger backyard shortly after I turned nine. Because I was diagnosed with a weak metabolism due to autism, Mom decided to actually grow food. The first two years were tough: the dirt was hard and full of rocks while the potting soil alone wasn't enough. Anything that did grow was infested with insects.

Therefore, my mother spent much time researching how to improve the soil. She ordered a large amount of organic compost as well as made her own from fruit peels, egg shells and table scraps. From the third year onward, our garden got better every season. There would be about 30 types of produce at harvest time. The juicy vegetables made the garden popular among our friends as well. People would often visit us in hopes of taking some home.

From Grandpa to Mom, everyone in my family has culinary talents. This is especially true for my mother - to her, being in a kitchen is like a fish in water. She is also well-versed in choosing natural and healthy ingredients. Her cooking skills are exceptional, and anyone who tastes our food would be greatly amazed.

Having enjoyed Mom's food for so many years, I recently picked up an interest in cooking as well. I'm hoping to learn a dish from her every few days. Please join me on my culinary journey as I share our stories and recipes.

Danny